Monday, February 4, 2013

Mini Valentines


Mini Valentine's Cards

Those are the little note cards I will be putting in my son's and daughter's care packages.

I am using some die cuts I purchased last Thursday at the Anaheim scrapbook fair.


-325-

It is always a challenge to come up with Valentine's cards ideas manly enough for our boys.

So I hid the heart on top of a cupcake, hoping it won't be too obvious.

I used Classic Scalloped Squares SM Spellbinder Nestabilities, and slid my folded paper just enough as to get the little holes close to the hinge, but not too much.

I printed a sheet of "Happy Valentine's Day" and cut the square with a punch, I then stamped my cupcake, used  a copic marker for the heart and added some Sparkle Scribbles gel as frosting.


The girl's card are a little more, well, girlish! I basically followed the same model but I used a Lifestyle Crafts Nesting Dolly Square for the cards, changed the coloring of the cupcake and added a border made with those new Skinny Stampers from Stamps by Judith.


Until Next Time!

A Magic Birthday Card

A Magic Birthday Card

I know, I have been away for a while and I thought I would do a big come back with what I think is one of the best idea out there. 

A birthday card that opens with a bang!

Now, let me tell you, this is not my idea, I just adapted it for my youngest 18th birthday.

Last year, I made a Shark Birthday Card, Happy Birthday for a Diver (http://afrenchaccent.blogspot.com/2012/01/birthday-for-diver.html)
and it was hard to top that this year.

Until I stumbled on this tutorial on Pinterest, my all time favorite place to find inspiration...

Since Cristal Alves-Tusim is much better at explaining and much much better at filming that I will ever be, head over to her tutorial on youtube for the explanations.

http://www.youtube.com/watch?feature=player_embedded&v=L5Y1kcAnxAE

Here is my rendition:

a perfectly plain 18th birthday card...


But wait!!!!!!

(Like in those info commercials on TV where you get not one but two at $19.99)

Pull on the top little ribbon and what do you see?
The 18 is coming to life!!!!

And there, the sky is the limit. The key to a perfect card is first, finding a marker that dry quickly on the acetate, and secondly, precision in the place you put adhesive or your card won't slide correctly and this is so frustrating. 

Also, Cristal made a slight mistake on her measurement, for the place to score the "envelop" part of the card. If you do score at 2 inches, it will leave a gap in the center. You need to add 1/8... 

Do a mock card first with scrap paper to make sure you have the right measurement.

Anyhow, here is what my son card looked like below:


-324-


I used some stubbies from Stamps by Judith. I was at the Anaheim scrapbook fair last thursday and I went crazy with those because I am using them everywhere...

Check them out at:

http://www.stampsbyjudith.com/?q=stubbies


I stenciled the numbers, and used my copic markers.

Until next time!

Friday, November 30, 2012

A New Home

A New Home

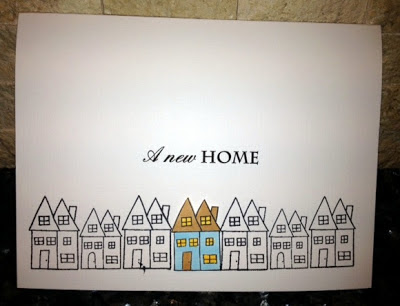
At my last craft fair, a customer asked me if I had a card for a new house. I actually had one that said "Welcome Home" but the message wasn't what she wanted her card to read.

I took back the model in my post #269 and just changed the sentiment.

The colored home is actually propped with dimensionals foam and stand out in the line of houses.

I used a clear stamp from TheStampsOfLife.come and colored the home with my Copic Markers.

-323-

Until next time...

Not Sent From My iPhone


Not Sent From My iPhone

I have seen those cards in many different variations, but I wanted a very simple one for those of us that think a pen and a paper still have their place in our world.


-322-

I just rounded the corners after printing the sentiment.

Until next time...

I Am Here For You

I Am Here For You


Clean and Simple... and powerful.

A simple pink ribbon... nobody need an explanation for it anymore, to assure your friend that she is not alone in her fight.

-321-

Until next time...

Good Luck My Friend


Good Luck My friend


A Clean And Simple card... I punched 4 hearts out of green linen and glued them to form a 4 leaves clove.

I chose a handwritten font for the printed sentiment.

-320-

Until next time...

Thinking of You

Thinking of You

In the same spirit than my post #203, another Sympathy card, with a touch of pastel, since it seems I am in a pastel mood lately.


I used two different embossing folder, a tree from Crafts-Too and some bulrush plants from Jim Holtz Sizzix Alterations collection.

 -319-

The butterfly is made with a Martha Stewart punch, and the Thinking of You sentiment comes from an older clear stamp set.

Until next time...
(by the way, I am sooo happy my punctuation is back!)

Thursday, November 29, 2012

Happy Birthday with a Touch of Pastel

Happy Birthday, with a Touch of Pastel

This is going to be a challenge

Let me explain: my keyboard is not cooperating, or something is living inside and eating little by little, key after key, starting with the bottom left part

As you can see, I am loosing punctuation marks as we speak!

If I wait any longer to post, nobody will be able to understand what I mean

But, a picture being worth a hundred words (and trimming, like punctuation, etc) here is my newest creation

Once I was done with the latest thank you card, I thought of using this flower garland someplace else, and there it is!


-318-


The sentiment was printed from my computer, I then use a Cuttlebug embossing folder for the top three quarter of the card and added the flowers garland (punched with the same EK punch) at the edge of the embossed part

I then used my Copic BG11 to highlight the design

Until next time, and with all my key stokes in play,


Wednesday, November 28, 2012

A Pastel Thank You

A Pastel Thank You

A CAS card, for a change... Clean And Simple 4bar card in Tiffany Blue color. 

The sentiment printed is actually the same color than the light blue piece and the flowers garland.

-317-

I used an EK punch for the flowers garland, and a Fiskars one for the edge of the top panel.

I then attached a piece of Tiffany blue card stock that I marked twice with an embossed line.

Until next time...

Sunday, November 25, 2012

Heart-full Christmas Tree

Heart-full Christmas Tree

Another of my Pinterest inspiration, from another Stampin' Up demonstrator called Margaret.

Check out her blog, Making Papercrafts, at http://makingpapercrafts.blogspot.co.uk/

She had the very clever idea to make a Christmas Tree with upside down hearts... and it worked!


I used the Hearts from Spellbinder Nestabilities for the big heart and the little $1 punch you used to find at Michael's for the little one.

The trunk (which is actually a flower pot) is a stamped image from Martha Stewart clear floral stamps, as well as the bow.

I printed the sentiment with two different fonts and added a little blue with my BG11 Copic marker on the stars to give them dimension.


-316-

Until next time!

Christmas Tree

Christmas Tree

Pinterest is so full of inspiration, but a dangerous pass time.

"Tout en moderation", (everything with moderation) is the key, and I am sticking to it for the time I spend lost in Pinterest.

Still, no place like it to find beautiful idea like the one below:


This is part of a card made by Sharon Cheng, a Stampin' Up demonstrator with a vision, I'll say!

If you want to see how the Christmas Tree is made, here is the link:
://www.sharoncheng.com/2010/12/art-to-go-printers-tray-christmas-joy.html


Or I can try to explain how I made mine: I used some green scrap paper I had and the scalloped circles from Lifestyle Crafts. 

I cut three circles, starting by the biggest one and using the one to the next each time. I then cut them in half and form three cones that I staggered on the front of the card.

I added a trunk for the tree, and used my bone folder to add a 1/2 inch frame around the card.

-315-

Until next time!

Friday, November 23, 2012

Piano Keyboard Thank You

Piano Keyboard Thank You

Because I seem to never have enough of those piano cards... (cf posts: 43, 254, 303)

A change to my usual Piano Birthday card, this time, I made a thank you one.

The web is full of piano keyboards template to print. I made mine to fit a 4bar size card (47/8 inch).

I then printed a sentiment and cut it in 1/2 inch tag. I rounded the corners and propped it with 3D glue dots.


-314-

To finish it nicely, I added a red ribbon.

The inside is lined in white linen.

Until next time!