Showing posts with label 3D paint. Show all posts

Thursday, June 7, 2012

Father's Day Card for a Diver

 Father's Day Card...
... for a Diver.

Yes, we have one of those in our home! 

Since I made a Birthday Card for my son (cf post 210) with a diver, and a shark, I already had an idea of what I wanted to do.

Pretty much the same, minus the shark... 

I run a blue card stock through my cuttlebug in a Bubble Cuttlebug Embossing Folder, and added a piece of torn vellum to make the sky.

The Papertrey ink sentiment is printed on a cloud made with a Fiskars cloud punch.

I added some 3D paint to make the bubbles.


-304-

Until next time....

Saturday, March 31, 2012

Birthday Orchid

BIRTHDAY...
... orchid.

As Clean And Simple goes, it doesn't get any better than that.

A simple orchid stamped next to a classy sentiment.


-264-

I used an orchid invite stamp from Stampendous.com, but masked the "invite" part.

I chose a khaki ink to soften the printed image, and filled up the petals part with 3D paint, my go-to Tulip Metallics in white.

When I say simple, I mean simple... simple the results, simple the making...

Until next time...

Butterflies Birthday

BUTTERFLIES...
Birthday.

I always liked cards with a feeling of movement. Nothing like butterflies ready to take flight to illustrate this.

When I was in Julian last week, butterflies were fluttering all over freshly blossomed flowers.

 This inspired me to design this card for a very special friend of mine. I chose this country feel designer paper for its striking resemblance to the field of little flowers under the apple trees.


-263-

The butterflies were made with a Martha Stewart punch, as well as the bottom edge of the patterned paper.

I added a "body" to the butterflies with puffy paint, Tulip Metallics White.
Look closely... bottom right... a little heart in puffy paint.

The sentiment was designed on my computer.

Until next time...

Tuesday, February 28, 2012

Welcome Baby

BABY CARDS...

 ... how much more fun does it get?

And for some reason, girls baby cards come to me easy.

This little baby dress is raised by dimensional, which added another dimension to the card.


Posted by Picasa-234-

The welcome baby sentiment was printed on my computer.

At the corners of the pink card stock, I used the 3D Tulip metallic paint to add the little pearls.

Until next time...

Thursday, February 23, 2012

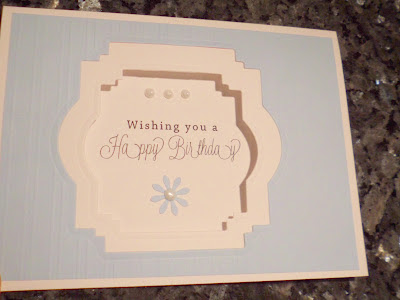
Happy Birthday in a Window

SPELLBiNDERS...
... Nestability.

Whoever thought of making dies in concentric shapes had to be a genius.


The blue card-stock was scored every 1/2 inch to give it a little special something...

I like the end result.


Posted by Picasa-230-

I used two consecutive Spellbinder Nestability for the window, and the blue top card stock.

The sentiment was printed on my computer, and I glued a flower punched in the same blue card-stock.

The heart of the flower and the three little pearls were made out of 3D Tulip metallic paint.

Until next time...

Wednesday, November 30, 2011

Wishing you Rainbows and Sunshine (pastel colors)

Wishing You Rainbows and Sunshine

100 posts ago, I did a card that I really adore (post # 46) but it was pure hell to make.

After falling in love with those floral embellishments from Recollections, I revisited this lovely card, using pastel colors instead.

I added a drop of 3D paint in the center of the flowers.

I also punched the clouds out of a sky blue distressed paper with my Fiskars clouds punch.

Posted by Picasa-146-

Less work, more pleasure and a prettier card. Winner!!!!!

Until next time.

Wednesday, November 23, 2011

To My Sunny Friend

To My Sunny Friend.

Well, it happened again... I found a stamp that I had no knowledge I ever owned, or purchase or want to purchase for that matter.

My Sunny Friend... let's add a "TO" to it, now I got it.

Doesn't it make more sense?

Still loving those paper flowers and trying every single place to stick them on. Here on a piece of Kraft paper, stamped in white ink and with a puffy paint center.

Posted by Picasa-119-

Until next time.

Tiffany Blue Flowers Card

Tiffany Blue Flowers Card.

Similar to the precedent card, but I skipped the stem part and just glued the flowers in a row, a little askew.

This is a smaller version, 4bar, and it would be perfect for a quick note.

Posted by Picasa-115-

Until next time.

Tiffany Blue and Flowers in a Row

Tiffany Blue and Flowers in a Row.

Once I begin with those floral embellishments, I can't stop!

 I used my tiffany blue paper so that the creme flowers would stand out, and stamped the stems with a Rubber Cafe stamp.

I then masked the flower part with a paper flower and added puffy paint in the middle.

Instead of using linen card stock, I finished a stack of already made cards with a recessed middle part, where the blue paper fits just right.


Posted by Picasa-114-


And here is the same card on a white background:

-122-


Until next time.