Monday, December 26, 2011

Thank you Card Silver

Thank you Card Silver.

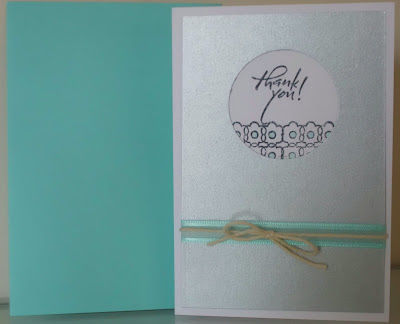
With the same idea than the Congratulations card on the post #201, I made a thank you card.

I stamped a double row of mini flowers on the white linen and color their center with my copic marker.

I also stamped a sentiment from the Thanks a Bunch set from Sparkle'n Sprinkle.

I punched a circle on a piece of silver card stock 1/4 to 1/2 inch smaller and tied a ribbon and a piece of cotton twine on top.


Posted by Picasa-205-

Until next time.

Monday, December 19, 2011

I am Missing Yo...

I am Missing Yo...

A wonderful quote found on Pinterest... I had to make it a card.

After printing the quote on a white linen card stock, I added touch of color with my copic marker.

That's it!


Posted by Picasa-204-

Until next time.

Sympathy

SYMPATHY...

It is always hard to find the words to help alleviate the pain of somebody who just loss a love one.

Maybe a simple card is worth a thousand words.


Posted by Picasa-203-


I used a cuttlebug embossing folder for the tree. The silver card stock is from paperandmore.com.

The butterfly is made out of silver card stock with a Martha Stewart punch.

I printed the sentiment and cut it out with a Lifestyle crafts party flags die cuts.

I also added a very slim white ribbon bow on the flag and a silvery ribbon at the bottom.

Until next time.

Thursday, December 15, 2011

Wedding Couple


WEDDING COUPLE...

I had a lot of requests on the way I made this card. Unfortunately I didn't write anywhere how I did it... so let me trace back my steps...


Below are two templates, which dimensions are perfect for a 6 X 6 trifold card, to fit in a 6.5 X 6.5 envelope.

The black card stock is 12 X 6, scored at 3 and 9.

Inside the middle panel, I added a 5 7/8 X 5 7/8 white piece of card stock with a "A Day to Remember" stamped sentiment.

 Here is the wedding dress template (it should come out as 5 7/8 X 5 1/2): I cut out two pieces, the bottom part and the top part, and I run a white ribbon at the waist. 


For the tuxedo shirt, I used this little template below in the same card stock than the wedding dress and made two matching lapels in black on each side of the shirt. I do not have an actual template for the lapels...


This triangle should measure 2 1/4  X 2 1/2.

The buttons are little 1/16 punches.

The bow tie is made of two 1/2 by 5/8 triangles, with a 3/16 circle punch in the middle.

If you glue the shirt piece a little off the black card stock, it will have more punch.

Below is the final result (a picture is worth a thousand words).

Let me know if you need more help on that.


Posted by Picasa-202-


Until next time....

Congratulations

Congratulations

The sentiment was printed beforehand, on a white linen card stock, and I added a top piece of card stock with a punched opening.

Below are two versions of the same card, with different top card stock.

I also stamped two little flowers top and bottom of the sentiment and added some sprinkle at the center.

A Martha Stewart wide silver ribbon and a very slim white ribbon finish the card nicely.


-177-

Posted by Picasa-201-

Until next time.

Peace and Love and Everything Sweet

Peace and Love...
and everything sweet.

I had to use Word Art to print the sentiment in a curvy way.

I then drew free hand and very lightly, the outline of a dove with a pencil.

The fun part came after that: with a metallic dimensional fabric paint from Tulip Metallics, I dropped little dots and tried to line them up, and make them the same size.

Try on a piece of paper beforehand to make sure you get the hang of it.


And a close up:


Posted by Picasa-200-

NOW, wait until the paint is really, really dry before attempting to erase the pencil marks!

Until next time.

Tuesday, December 13, 2011

Simplicity

Simplicity.

Because I never have enough of those little cards for a quick note...

I used the flower in the Thanks a Bunch set from Sparkle'n Sprinkle and colored it with my copic markers.

Paired with a Tiffany blue envelope, it looked very beautiful!


Posted by Picasa-199-


The rounded corners finish the card nicely.

Until next time.

Butterflies Birthday Card

Butterflies Birthday Card.

Another card with butterflies... A birthday card this time!

I found that Martha Stewart wide silver ribbon in clearance a long time ago but never found the perfect place for it, until today.

Because of its width, it is quasi impossible to tie a bow with it; this is why I used it as a border rather and tied a white sheer ribbon on top istead. The silver backing makes the white bow more visible.

The butterflies are also made with a Martha Stewart punch and I just doodled behind them.

The stamp under the sentiment is from the Rubber Cafe as well as the sentiment. If I am not mistaken they are both coming from a grab bag at one of the fair I attended.

I used a very light blue ink so the sentiment is just highlighted by the flower stamp under.

Posted by Picasa-198-

Until next time.

Hearts and Butterfly

Hearts and Butterfly.

On a kraft card stock, I added a piece of green striped paper that reminded me of a patch of grass.

I stamped three flowers from Katie and Co and hid the flower part under three pink punched hearts that I lined up with a white marker all around.

I added a punched butterfly made with a Martha Stewart butterfly punch and doodled a dotted line under it.

I then stamped "I'll always love you", a ITTY BITTY stamp and colored the heart with my red copic marker.


Posted by Picasa-197-

To finish the card, I added a dotted line in white around the top edge.

Until next time.

Snowy Night

Snowy Night.

Another quick and easy to make card.

On a light blue card stock, I stamped some snowflakes in a lightly darker blue ink with a Recollections stamp.

I then punched a circle in silver paper and added two snowflakes stickers on it.

I finished the card in adding a little piece of white and clear ribbon.

Posted by Picasa-196-

Until next time.

Flowers Rainbow Serie

Flowers Rainbow Serie.

When you have a design you like, why don't make it a serie with different catchy sentiments?

Here is my "serie".

I just  lined up those floral embellishments from Recollections between two clouds made with a Fiskars punch on a card stock where the sentiment was already printed.

I chose two different fonts highlighting the important word in bold.


Posted by Picasa-195-


To finish the card, I added some dotted line around.

Until next time.

Guitar Birthday Card

GUITAR...
... birthday card...

I have that thing... when I design a card, any card, I have to imagine the person the card is going to.

It is not an easy process though. I see the person in my mind, think and think, and browse the web over and over, think a little more and wait until suddenly, the idea pop up.

This one was designed for my best friend's son (my sister from another mother, Roberta), the very talented Cameron from So Far Gone, a local band from San Diego with a huge future...

Check them out at:

http://sofargonemusic.com/bios.html

This was a no brainer: a guitar was what came to mind when I thought of Cameron.


Posted by Picasa-194-

To make this one, I drew a free hand template. I also used a metallic thread and brads to hold it at the bottom of the black piece... called "Neck" . This made a good rendition, I thought...

Until next time....


Monday, December 12, 2011

By popular demand...

By popular demand...

Just for my Anonymous fan, who couldn't find my post # 83 of the Window on Hanukkah Scenes, voici "les bougies devant la fenetre" with love...


Until next time....

Sunday, December 11, 2011

Tiffany Blue Flowers

Tiffany Blue Flowers

I told you I would be using those floral embellishments for Recollections a lot!

This time, I chose some Tiffany Blue ones, lined them in a row and added some puffy paint at the center of the flowers.


Posted by Picasa-193-

Until next time.

Merry Christmas

Merry Christmas.

Doodling, I just love doodling!

Especially when the doodling means something.

I used a 1 inch circle punch to make two ornaments that I colored with my copic markers before adding some sprinkle on top. I then used a gold marker and wrote Merry Christmas.

The ornaments seem to be hanging by that gold message.


Posted by Picasa-192-

Until next time.

Lacy Christmas Tree


Lacy Christmas Tree.

I really had fun making this card. On the internet, the use of paper doilies is widespread in card making: you can make dresses, or anything lacy.

How about folding it in triangle, and making a Christmas Tree?

I added a star punched with a mini punch from recollections and run a thread of silver thread to mimic a strand of garland.

The only thing left to do was to add a snowy background and a  piece of brown paper as a trunk.

Posted by Picasa-191-

Until next time.

Season's Greetings

Season's Greetings.

Very simple card, all in the printing and the choice of colors and fonts...

Once the card was printed, I added some Christmas Lights with my copic markers.


Posted by Picasa-190-

Until next time.

Home

Home.

This ITTY BITTY stamp is really one of my favorite.

I usually color the windows opening in yellow to relay the light of the inside of the house which makes it a Home.

This time in coloring a few accent of the outside i thought it was conveying the message better.

I also choose the font of the message very carefully.


Posted by Picasa-189-

Until next time.

Life is a Beautiful Ride...

Life is a Beautiful Ride.

Once you find a catchy and oh-so-true! quote, the only thing left to do is find the perfect font to match.

There it is:

Posted by Picasa-188-

Until next time.

Little Things

Little Things...

Oh how much this is true....

especially when you find yourself with two kids in college and one last one a year from doing the same. 

When the kids are little, you think your life is completely static and it is going to stay that way: the kids bath, homework, spelling test, reading a story, bed time...

Unfortunately, this also passes, and you look back and think, "those were the little things"...

Posted by Picasa-187-

I used this wonderful font called: Fontdinerdotcom Sparkly, and added a touch of color on the little sparkle with a Sticky stamp from Stamps by Judith.

I matted my white linen with a blue card stock the same color that the ink I used.

Until next time

Never Give Up

Never Give up.

Another quote that does make more sense as you get older.

How many time, when you look back, you are thinking, I could have...

Always trust your guts and think you can do it.


Posted by Picasa-186-

This quote needed a very stern font to carry this message: I used Prestige Elite and added a touch of color with my copic marker.

Until next time.

Everything is going to be Alright

Everything is going to be alright.

Just a little pick me up quote for when someone needs a hands. Sometimes a card with the right message is all that is needed to feel better.

I chose to make the two most important words in bold to add to the message.

Posted by Picasa-185-


The touch of color is added with my copic BG11 Moon White... barely there.

Until next time.