Showing posts with label silver. Show all posts

Friday, November 21, 2014

Butterfly Silver Card

A butterfly silver card that can be used for many occasions. This is why I didn't print any sentiment.

The butterfly comes from a Cheery Lynn designs die cut, using the cuttlebug. I then taped it back on the inside of the silver card stock.

The detail at the bottom of the silver was cut with Spellbinder nestability labels 19.

I chose a pale green ribbon to finish it.

-436-

Until next time!

Tuesday, November 11, 2014

With Love

With Love

It has been a while since I haven't posted anything.

Well, I am back!

Here is a cutting file from Birds, (birdscards.com), I used gold and silver card stock.

Resizing the cutting file to make A2 cards, and adding a white linen insert were the two alterations I made to Bird's card.


 -429-


Until next time!

Monday, May 5, 2014

Mother's Day Butterflies

This time, I used a cutting file from Bird, with my Silhouette Cameo and made a few different cards in changing the framed sentiment.


Here is a Mother's day one, but it could also be a sympathy, birthday or else.


-425-

Until next time.

Sunday, December 1, 2013

Have a Good One

The second card with another cutting file from Pam Kenward (getsilvered.blogspot.com), is also altered from the original cutting file. 

It was designed for a square card and I prefer the A2 format.

I used a silver paper for the  cut out piece.


-420-

A clean and simple card, that could go for a masculine birthday.

Thank you Pam!


Wednesday, November 27, 2013

Thanks... to Bird

Thanks to Bird, I used two of her cutting files. The "thanks" one and the cut out card.

Check out her blog and free cutting files on:

birdscards.com


The happy birthday cutting file is a silhouette cameo file.

I mated the two cards in silver paper and thread a blue/silver ribbon.


-417-

-418-

Sunday, October 27, 2013

Chritmas Trees from Bird

Here comes a few Christmas cards using two different Christmas tree cutting files from Bird (birdscards.com).

I just change the trees and backgrounds from Kraft to silver, and printed a few different sentiments.

The last one is even handwritten.

Some are double matted and some have an embossing line framing the card.

 -398-


 -399-


 -399-


 -400-


-401-

JOY, Christmas Cards

I needed to begin my Christmas cards, a little early, I know but I had some inspiration and help from Bird of course. Her cutting files are amazing, check out her wonderful blog:

http://www.birdscards.com

I printed the background using the Simon font, it gives you a nice empty space where you can add some color, silver here.

The  snowflakes come from a QuicKutz Sparkles cutting file I run through my cuttlebug, and added two embossed lines to hold the silver snowflakes. Difficult to see but I also glued some little diamond in their center.


 -394-


The swirly christmas tree is a Bird cutting file and there is also a little diamond at the bottom....

Simple, silver and classy... 


-395-

Monday, May 20, 2013

Many Thanks, all CAS

Many Thanks, all CAS

Because sometimes revisiting old models of cards is rewarding,  I felt like making some more Clean And Simple thank you cards.

Here come the blue on silver collection, using those beautiful Sparkle and Sprinkles thank you stamps, "Thanks a Bunch".


 -337-

This round sentiment in silver ink, just pop up of the blue... I lined it with white and silver card stock.


 -338-

From the same stamp collection, a majestic "thank you" all adorned with swirls.


 -339-

And to go back to basic, a french thank you, really classy because very plain.


-340-

A few months back, I made some "It's A Shower" (cf post 150), using the Martha Stewart line of gifts punch.

I reused this old idea adding "a note of thanks" sentiment I printed on my computer. I just love this font, called Channel slanted.

Until next time!


Friday, May 3, 2013

Hope you Feel Better in a Cloud!

I had that embossing folder for a while now but never found a way to use it.

I embossed a pannel and fileld up the frame with some silver paper.

The sentiment was printed and cut out with a fiskars cloud punch.

I just added a double embossed line at the edge to finish the card.


-332-

Until next time...

Thursday, May 10, 2012

Filled with Love

Filled...
... with love

Ever since I found that Mason Jar stamp, I have been thinking of the best way to use it in a card.

A jar. A jar is filled with something. Jam. Sweet things.

OK, let's filled mine with love.


-291-

After the Scrapbook fair last week end, I came back with a load-ful of embossing folders, that I also was dying  to use.

I run the silver card stock through my cuttlebug in a Chevron Cuttlebug embossing folder. I was trying to match the silver ink I used with my Mason Jar INKADINKADO stamp.

I first stamped the image on vellum, then embossed it with a Heart cuttlebug embossing folder.


I then added a yellow card stock that I trimmed just a little bigger than the jar itself.

The labels is from Kaiser Scrapbook and the sentiment is a tiny one from Sparkle n' Sprinkle.


I finished the card with a yellow baking twine, I cannot get enough of those...

Until next time....

Thursday, May 3, 2012

More Silver Graduation Cards

 MORE SILVER...
,,, Graduation Cards

As the graduation announcements are piling in my mail box, I realized I might need more Congratulations Graduate cards.

So this is what I did this afternoon.

Keeping with the silver and white spirit,
I came up with 4 more ideas. I think I might actually have enough cards, now.


 Idea #1:


-282-

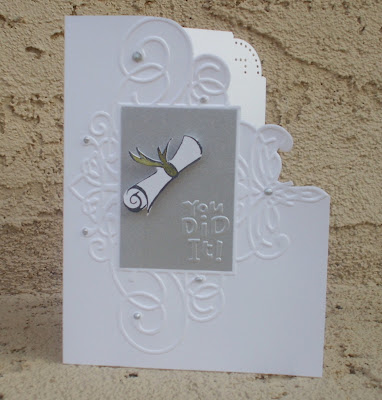
I finally used this Cuttlebug embossing folder I own and never got out. I must admit, cutting the top right corner out is not my idea. I saw this on Pinterest, and the beautiful card comes from this blog:

http://flowersparkle.blogspot.com

Check it out!

The sentiments are also embossed with a Cuttlebug folder, and the diploma is a stamp from Sparkle'n Sprinkle.

The cap is from this wonderful $1 Michael's stamp set.


Idea #2:


-283-

Keeping with the same idea, I used a Cuttlebug Embossing Folder I just received: this one embosses two sets of two horizontal lines. 

In the space between them I taped a silver ribbon.

The sentiment are embossed with those mini Cuttlebug embossing folders, and I added a diploma or cap with dimensionals.


Idea #3:


-284-

Not that much different from the last one, just a circular sentiment on top of a black card stock cut with a Lifestyle Craft Scalloped Circle.


Idea #4:


-285-

Embossing folders galore... there are the Cuttlebug with horizontal lines, this time set right in the middle, the mini Cuttlebug folders "simple shapes" for the silver flower and diamond, and the mini sentiment ones.

Until next time!


Thursday, March 29, 2012

Thank you... For being so thoughtful

THANK YOU...
... for being so thoughtful.

Pinterest is MY source of inspiration, daily.

 I found a beautiful card from:

http://iminhaven.blogspot.com/


and another from:

http://www.splitcoaststampers.com/gallery/photo/1965165


and had to try one (or two) of my own...

I just loved the two tones, silver and white.


-262-

For both of the card, I printed the sentiment on a silver card stock cut 2/8 shorter than the regular width of an A2 card.

I also punched the bottom edge with a Martha Stewart edger puncher.

For the top one, I used a new stamp from ditto, and just colored the leaves with my copic.

The bottom one used daisies stickers from Stickopotamus and I free drew the stems using a Pentel gold metallic gel pen. Very often, it will appear khaki color on some card stock.

This is it! Thank you my fellow crafters for inspiring me every day.

Until next time!

Wednesday, March 28, 2012

+++ the best is yet to come +++


+++ the best...
... is yet to come +++

Now... How cute and versatile is that quote? 

It is perfect for so many occasions: you could make it a wedding card, a new baby card, a graduation card, etc,  etc...

Below are two of my takes, a wedding card and a new baby card. I am sure I will use this again in a near future.

Just in case you want to do the same, I added the image below.


Let me know if it is easy to download and use.

For my first card, I had a craving for flowers and dragonflies. This is what came out!


Here is a close up of the printed sentiment...
 I love the flying  birds in an infinite sign pattern.


The dragonflies are printed in white on silver card stock and I added some dimensional glittery paint on top of the body.


The flowers are punched paper and the centers are made with a Paper-Pen from Viva, in 3D paint Sunny yellow. Any dimensional paint would work there.

I used a Martha Stewart stamp for the flowers stems, and a Martha Stewart edger punch for the bottom of the silver panel.

The finish touch was a simple bow in clear ribbon.


And now, for a totally different use of this sentiment, a new baby card.


-260-

I just can't get enough of this little Recollections baby footprints stamp. I used Nestability to cut a simple circle and a scalloped one to frame the printed image.

 It is then propped up with some foam stickies.
Et voila!!!!

Until next time...

Sunday, March 11, 2012

Graduation... a last hick-up....

GRADUATION...

... a last hick-up.

Well just for this week at least. I can't say the Graduation virus won't strike again but for now, this is it.

Two more little simple cards, with popped up graduation classics (a cap and a diploma), inside a circular sentiment, you can download below:


http://rubberstamping.about.com/od/greetingscards/ig/Birthday-Sentiments/

It doesn't get any simpler than that.

I chose silver and black, but this card could be customized to any high school or college colors.

Looking at the pictures below, I just realized I forgot to highlight the tassel and the cord on the diploma in gold... just close your eyes and imagine.


-249-

I am still using that $1 stamp set, my favorite when we talk graduation.


Until next time...

Thursday, February 2, 2012

Thank You Precious


THANK YOU...
... precious.

Each time I look at that card, I cannot prevent myself to smile.

 I made those as a gift and when my friend saw those, she said:
"I cannot give those away."

Doesn't that kind of defy the purpose of owning thank you cards?

I told her there were plenty from where this one comes from.


Posted by Picasa-213-

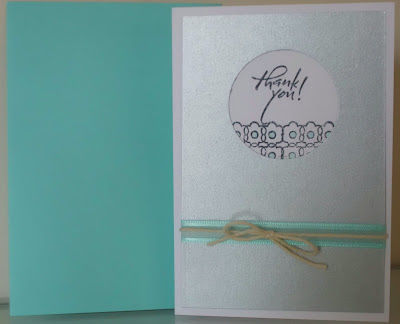
The round sentiment is part of a Sparkle n Sprinkle Thanks a Bunch stamps set.

The silver card stock is from paperandmore.com, and I just punched a circle allowing the sentiment to peek through.

I also tied a shinny white ribbon under the silver card stock.

Until next time...

Monday, December 26, 2011

Thank you Card Silver

Thank you Card Silver.

With the same idea than the Congratulations card on the post #201, I made a thank you card.

I stamped a double row of mini flowers on the white linen and color their center with my copic marker.

I also stamped a sentiment from the Thanks a Bunch set from Sparkle'n Sprinkle.

I punched a circle on a piece of silver card stock 1/4 to 1/2 inch smaller and tied a ribbon and a piece of cotton twine on top.


Posted by Picasa-205-

Until next time.

Thursday, December 15, 2011

Peace and Love and Everything Sweet

Peace and Love...
and everything sweet.

I had to use Word Art to print the sentiment in a curvy way.

I then drew free hand and very lightly, the outline of a dove with a pencil.

The fun part came after that: with a metallic dimensional fabric paint from Tulip Metallics, I dropped little dots and tried to line them up, and make them the same size.

Try on a piece of paper beforehand to make sure you get the hang of it.


And a close up:


Posted by Picasa-200-

NOW, wait until the paint is really, really dry before attempting to erase the pencil marks!

Until next time.