Showing posts with label Stamps by Judith. Show all posts

Friday, December 5, 2014

Caught a Bug?

Caught a Bug? Get well soon!

Another funny card, unfortunately the picture doesn't give it credit.

I used a Bug Stick from Stamps by Judith inside another of her stamp, a mini jar. 

I then colored a little with a blue Copic and added a 3D crystal Lacquer that when dry, look like glass.

I then framed the picture in black and in red.


-448-

Until next time!


Thanks in Tiffany blue

 Another of Bird cutting file, and another adaptation. I made a similar card on November 2013, (post #418), and wanted a simpler one.

This is the results: a little piece of Tiffany blue paper and a heart stamp from Judith, one of those wonderful sticks I can't get tired of.


-446-

Until next time.

Snow Scene

A Snow Scene cut with my Silhouette Cameo using Bird cutting file. (Birdcards.com)

I added a few piece of card stock on the under side to mimic the light at the window and the driveway to the door.

On the blue background, I also stamped some snow flakes with the Snowflake stick from Stamps by Judith. 

-442-

Until next time!

Sunday, October 27, 2013

Snow Scene from Bird

I kept the best for last, I really love how this one came out....

I used once again a snow scene cutting files from Birds, and added a dark navy blue background, I also stamped a few stars to make the sky sparkle.

Behind the windows of the house, I glued a little piece of yellow felt, it looks like somebody is home.

Love that one!

-403-

You're a Star

I found that idea on the net but unfortunately I lost the link... sorry about that...

The hardest thing to do was to center the star punch on the little dice... 

I drew free hand the lines to frame the card and added some stamped stars made with a  Skinny from Stamps by Judith.

I printed the sentiment, added some dimensional under the dice, and glued the baker's twine knot.


-391-

Friday, August 16, 2013

Quick Little Cards

Mason Jar, you are everything... in kraft  with a mason jar stamped on vellum with silver ink, and a heart punch to let the sentiment peer through.

I added a little piece of string around the neck of the mason jar, and stamp a red heart with a stick from Stamps by Judith.

-377-

Thank You in Fashion, a sentiment printed around a beautiful image.

-379-

Paris Bon Voyage, a vision from the 60s ...

-380-

And a simple bonjour....

-381-

Until next time...

Monday, May 27, 2013

Happy Father's Day

Happy Father's Day...

The fathers for whom a relaxed father's day is not an option like the previous cards, here is one loaded with honeydo project.

A versatile stamp from Stamps by Judith, the tree for all seasons, adorned with little impression from the Stubbies stamps.


-344-

The sentiment was printed before hand.

Until next time...

Thursday, November 15, 2012

Birthday Gifts in a Window

Birthday Gifts in a Window

I found that "It's Your Day" flocked paper at one of the Scrap Fair I visited last year but haven't found a use for it in a card so far.

A  Spellbinder Nestabilities rectangle die allowed me to use a small piece of it and make it stand out.

I actually embossed the die in the linen card stock before, and added the cut piece of paper inside.

The sentiment was printed from my computer and I added a little cupcake inked in light blue: it is a Stubby from Stamps By Judith, my go-to little stamp.


-313-

Until next time.

Saturday, April 21, 2012

Hope You Feel Better Soon

HOPE...
... you feel better soon.

Now, really I can't get enough of this idea...

I had to use it again...

-279-


The only difference here, is that I printed the sentiment and cut it with the Fiskars cloud punch, once the right way and once upside down. 

Here is another version on blue linen:


Until next time...

You Brighten My Day

YOU BRIGHTEN...
... my day

I cannot go on Pinterest without finding inspiration. I am so amazed with the amount of ideas those bloggers have.

Out come a new stamp set, and there goes the flood of OH and AH cards.

I fell in love with the one below from Debby on

http://tsgclearstamps.blogspot.com/2012/04/there-she-goesagain-new-trendsetter.html


Really, don't you think this is adorable?

Now, my turn:

-278-

I run a white linen card stock in a Cuttlebug embossing folder before punching the two size clouds (Fiskars).

It made them look like they are full of rain drops..


The sun is made with a Marvy Uchida 1.2 in punch.

I used one "stick" stamp from Stamps By Judith for the little hanging hearts.

The sentiment was printed before hand and I just made sure that one of the heart came as a "dot" on the "i".

Here is another version of the same card: the sentiment is printed on a banner pulled by a plane... off the card!


Until next time...

Tuesday, April 17, 2012

I Hope Your Dreams Take You....

 I HOPE....
... your dreams take you...

I always loved this quote.

I used it for my son 18th birthday card but it is so versatile that it would be perfect for a graduation card.

I think the font I chose to print this quote is particularly adequate. 
It is called Fontdinerdotcom Sparkly, and for me it is so close to what writing in a dream looks like.

Every so often, there are some little sparkly stars over the words and I chose to highlight them with one of those Stick stamps from Stamps by Judith.

The ink chosen is a very pale blue, which is not overpowering on the writing.


-276-


The dragonflies stamps were from Recollections.

I double scored the card under the quote and  rounded the bottom corners.

Until next time...

Tuesday, March 13, 2012

You Made my Day...

YOU MADE MY DAY...
... a little brighter.

There is no other day better fit for this card than today... or the other way around.
I was awaken this morning by a phone call from my daughter announcing she was accepted in Boston University for graduate school. 

We have been waiting for months to hear such a good news.

Here I am, uploading this card on my blog, and I am thinking this is a card made for occasions like this one.

I lifted this idea from Debby Hughes. She has a wonderful blog, Limedoodle and if you want to see her card, follow the link below:  

http://limedoodle.blogspot.com/2011/08/you-made-my-day.html


-251-

I do not own the Lil' Inker dies and stamps, I used a Quickutz rainbow die and two Fiskars punches for the small and bigger clouds, instead

The big cloud was turned into a tree canopy per Debby idea. 

I run a die cut through my Cuttlebug with 6 different colored card-stocks to make a truer than life rainbow.

The sentiment was printed in my computer, and the little heart is a Stubby from Stamps by Judith.

Until next time...

Thursday, March 8, 2012

Happy Spring

HOW DELIGHTFUL...

 ...it is when you can feel the change in the air in the morning, even if there is that leftover crispiness from a lingering winter.

That prompted me to design this very simple mini card for our upcoming college girls care package. 

A bitter sweet one, because this time, no hiding, it will be the last... our 22 years old girls are graduating this spring and there goes the excuse, us moms (and friends for more than 15 years) have been using to get together around appetizers and wine 4 times a year, for the past 4 years.


-245-


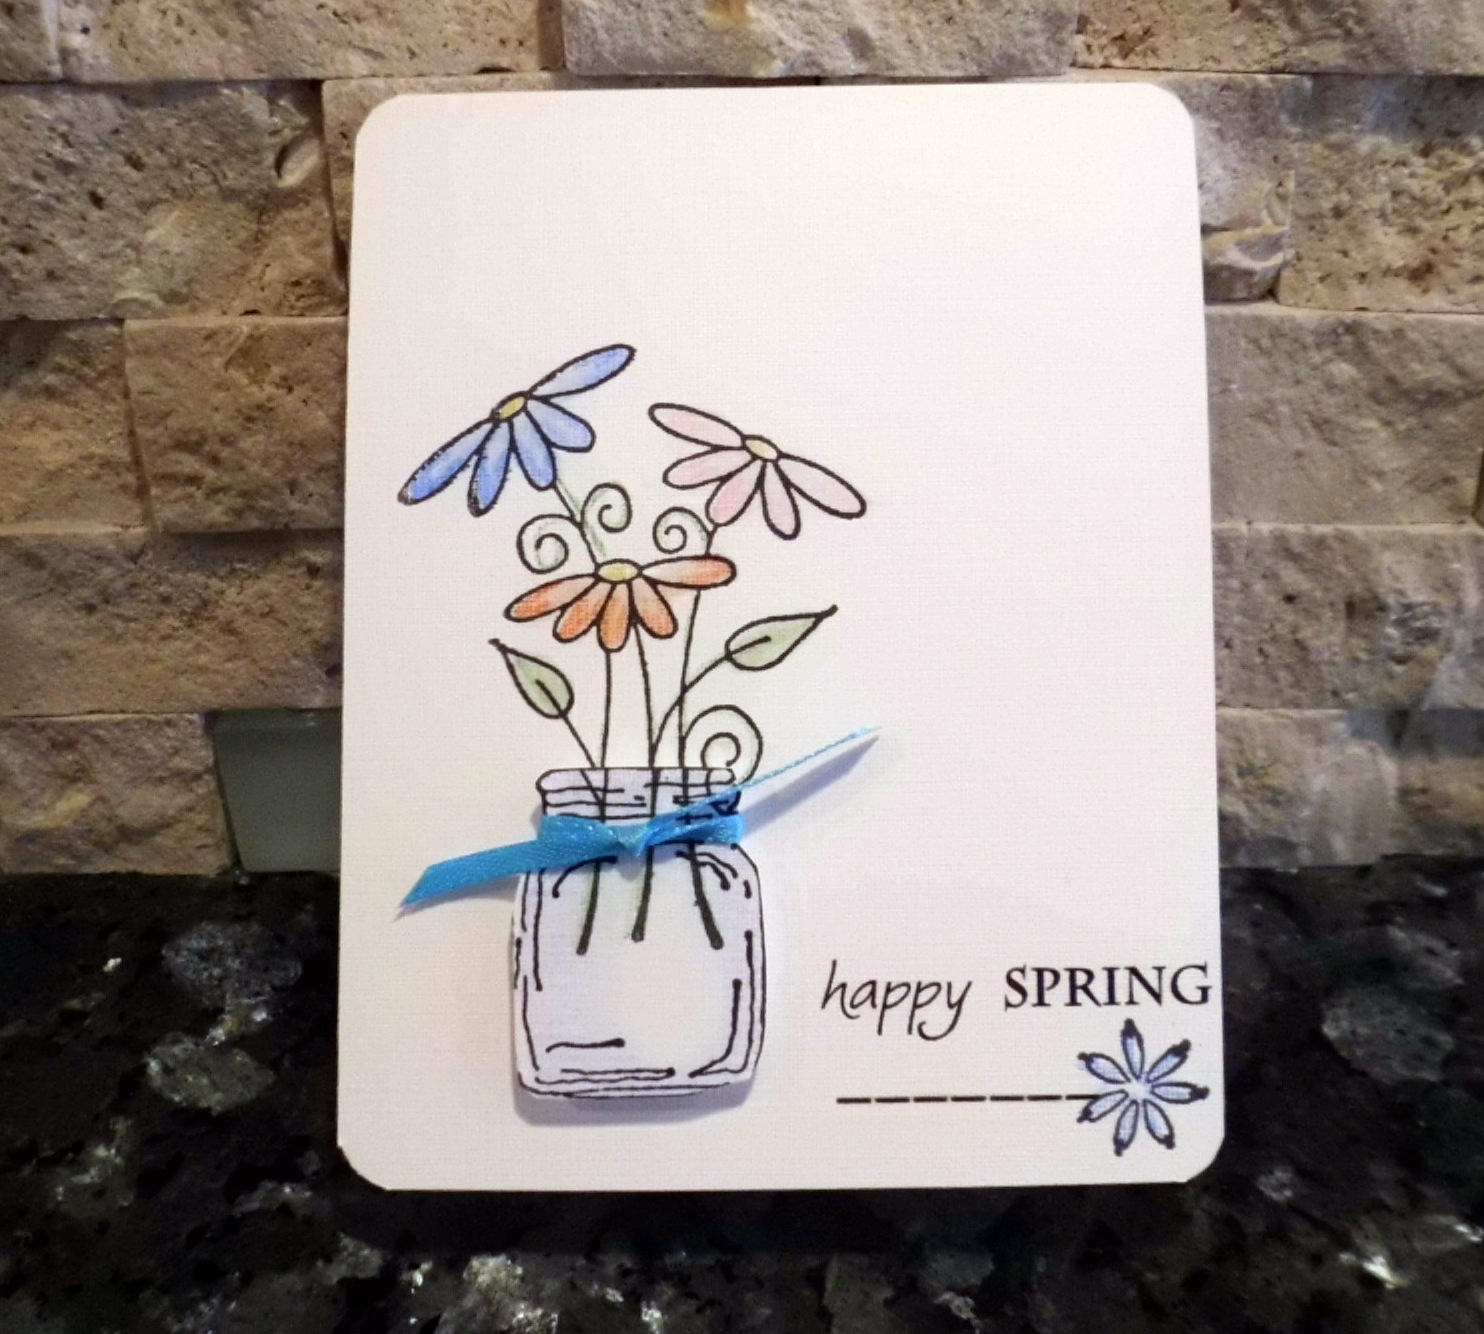
             This mini card was made using a stamp that is going to become my favorite, no doubt: the "mason jar" from Stamps by Judith and Heather. I stamped it on white linen, colored it and cut it out before adding it to the card with dimensionals.

That allowed me to add a small piece of ribbon around the mouth of the mason jar.

The little flower on the bottom corner is also from Stamps by Judith: one of their Stubbies.

The bouquet of daisies is from The Rubber Cafe and I tried myself at watercolors this time.

 For once, my Copic markers stayed in their drawer, and I used the VersaMarker pen with the watercolors pencils.

It was as much fun as when I was kid, using a watered down paint brush on those coloring book with dry paint.

Will use those more from now on...

I used a sentiment printed on my computer and added a dotted line as stem for the flower, before rounding the corners of the card.


Until next time.....

Wednesday, March 7, 2012

Flowers in Jars


FRESH...

... I felt like designing a "fresh" card... 

When my kids were little there was not a day that passed by when one would not come to find me in the kitchen with a little flower they had picked in the garden for me.

I would grab a jam jar, fill it up with water and put the lone flower in on top of the countertop.

How proud would I make them then....

Three kids, three flowers, in the three windows of this card.

This is a peek of my life, some 10 years ago...


-244-

This window card is from A Cut Above, the mason jar stamp is from Stamps by Judith.

The lone flower is a composite of a stem by Martha Stewart and a daisy stubby from Stamps by Judith.

The circular Happy Birthday stamp is from Sparkle'n Sprinkle, and I attached the tag made with a punch with some Martha Stewart baker's twine.

The Copic markers were lightly used.

Until next time....

Thursday, March 1, 2012

10 Little Fingers, 10 Little Toes

BABY CARDS...

... they are like babies and puppies... cute as a button.

This is the one kind of card I cannot run out of ideas for.

Just thinking of a new one put a smile on my face.

My biggest challenge is to slow down the avalanche of ideas that come to me when I think Baby card.


Posted by Picasa-239-


I started with a window card from A Cut Above.

I used the Stubbies stamps from Stamps by Judith, and colored them with Copic markers.

The "10 little fingers.." stamp is from Sparkle and Sprinkle.

I also used some 3D paint for the pearls in the corner of the top stamped image.

Part of the top flap has been embossed with my cuttlebug folder.

Until next time...

Birthday Tree

DO YOU MEAN...

... you've never heard of a Birthday tree?

Look below, here is one of those. Actually this tree is as versatile as a card can be.

You can use all kind of mini stamps and it can become a Money Tree, a St Patrick's Day Tree, a Halloween tree, a pear Tree (how boring, though), and the list goes on and on...

Well, mine is a Birthday tree, complete with party hat, cupcakes, balloons and gifts.

Posted by Picasa-238-

This wonderful tree stamp is another great idea from Stamps by Judith. It is called Tree for All seasons.

The little stamps or Stubbies are also from the same company.

I also used some 3D Crystal Lacquer on top of the coloring to make the little images stand out.

I know you cannot tell on this picture... you are going to have to trust me on that...

The pile of gift is a cut out image of the larger Pile Of Gift stamp from the same company.

Until next time....


Mother's Day Card


MOTHER'S DAY...

... it will be here before you know it.

Better be prepared than sorry.

Between you and me, this was just an excuse for me. I had to find a way to feature this beautiful Rubber Cafe stamp, and this new Cuttlebug Heart embossing folder.

The cherry on top of the cake was that little hanging heart... look closer to the right of the pot, see it? It is a different little stamp that was made to hang there.

 Don't you think so?


Posted by Picasa-237-

The flip card is from A Cut Above. 

The pot of flowers is from The Rubber Cafe. 

The little hanging heart on the right of the flower pot is a Stick from Stamps by Judith, as well as the branch in the top circle.

The white background is embossed with a Cuttlebug embossing folder.

I printed the sentiment in a circle from the internet. Check out this site:


http://rubberstamping.about.com/od/greetingscards/ig/Birthday-Sentiments/


Then the Copic markers worked their magic all around...

Until next time....

Sunday, December 11, 2011

Little Things

Little Things...

Oh how much this is true....

especially when you find yourself with two kids in college and one last one a year from doing the same. 

When the kids are little, you think your life is completely static and it is going to stay that way: the kids bath, homework, spelling test, reading a story, bed time...

Unfortunately, this also passes, and you look back and think, "those were the little things"...

Posted by Picasa-187-

I used this wonderful font called: Fontdinerdotcom Sparkly, and added a touch of color on the little sparkle with a Sticky stamp from Stamps by Judith.

I matted my white linen with a blue card stock the same color that the ink I used.

Until next time