Friday, November 30, 2012

A New Home

A New Home

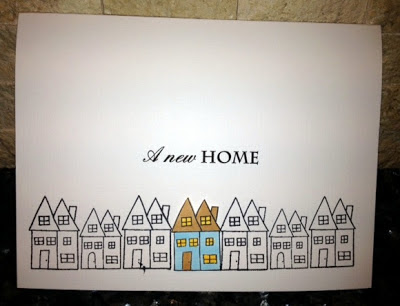
At my last craft fair, a customer asked me if I had a card for a new house. I actually had one that said "Welcome Home" but the message wasn't what she wanted her card to read.

I took back the model in my post #269 and just changed the sentiment.

The colored home is actually propped with dimensionals foam and stand out in the line of houses.

I used a clear stamp from TheStampsOfLife.come and colored the home with my Copic Markers.

-323-

Until next time...

Not Sent From My iPhone


Not Sent From My iPhone

I have seen those cards in many different variations, but I wanted a very simple one for those of us that think a pen and a paper still have their place in our world.


-322-

I just rounded the corners after printing the sentiment.

Until next time...

I Am Here For You

I Am Here For You


Clean and Simple... and powerful.

A simple pink ribbon... nobody need an explanation for it anymore, to assure your friend that she is not alone in her fight.

-321-

Until next time...

Good Luck My Friend


Good Luck My friend


A Clean And Simple card... I punched 4 hearts out of green linen and glued them to form a 4 leaves clove.

I chose a handwritten font for the printed sentiment.

-320-

Until next time...

Thinking of You

Thinking of You

In the same spirit than my post #203, another Sympathy card, with a touch of pastel, since it seems I am in a pastel mood lately.


I used two different embossing folder, a tree from Crafts-Too and some bulrush plants from Jim Holtz Sizzix Alterations collection.

 -319-

The butterfly is made with a Martha Stewart punch, and the Thinking of You sentiment comes from an older clear stamp set.

Until next time...
(by the way, I am sooo happy my punctuation is back!)

Thursday, November 29, 2012

Happy Birthday with a Touch of Pastel

Happy Birthday, with a Touch of Pastel

This is going to be a challenge

Let me explain: my keyboard is not cooperating, or something is living inside and eating little by little, key after key, starting with the bottom left part

As you can see, I am loosing punctuation marks as we speak!

If I wait any longer to post, nobody will be able to understand what I mean

But, a picture being worth a hundred words (and trimming, like punctuation, etc) here is my newest creation

Once I was done with the latest thank you card, I thought of using this flower garland someplace else, and there it is!


-318-


The sentiment was printed from my computer, I then use a Cuttlebug embossing folder for the top three quarter of the card and added the flowers garland (punched with the same EK punch) at the edge of the embossed part

I then used my Copic BG11 to highlight the design

Until next time, and with all my key stokes in play,


Wednesday, November 28, 2012

A Pastel Thank You

A Pastel Thank You

A CAS card, for a change... Clean And Simple 4bar card in Tiffany Blue color. 

The sentiment printed is actually the same color than the light blue piece and the flowers garland.

-317-

I used an EK punch for the flowers garland, and a Fiskars one for the edge of the top panel.

I then attached a piece of Tiffany blue card stock that I marked twice with an embossed line.

Until next time...

Sunday, November 25, 2012

Heart-full Christmas Tree

Heart-full Christmas Tree

Another of my Pinterest inspiration, from another Stampin' Up demonstrator called Margaret.

Check out her blog, Making Papercrafts, at http://makingpapercrafts.blogspot.co.uk/

She had the very clever idea to make a Christmas Tree with upside down hearts... and it worked!


I used the Hearts from Spellbinder Nestabilities for the big heart and the little $1 punch you used to find at Michael's for the little one.

The trunk (which is actually a flower pot) is a stamped image from Martha Stewart clear floral stamps, as well as the bow.

I printed the sentiment with two different fonts and added a little blue with my BG11 Copic marker on the stars to give them dimension.


-316-

Until next time!

Christmas Tree

Christmas Tree

Pinterest is so full of inspiration, but a dangerous pass time.

"Tout en moderation", (everything with moderation) is the key, and I am sticking to it for the time I spend lost in Pinterest.

Still, no place like it to find beautiful idea like the one below:


This is part of a card made by Sharon Cheng, a Stampin' Up demonstrator with a vision, I'll say!

If you want to see how the Christmas Tree is made, here is the link:
://www.sharoncheng.com/2010/12/art-to-go-printers-tray-christmas-joy.html


Or I can try to explain how I made mine: I used some green scrap paper I had and the scalloped circles from Lifestyle Crafts. 

I cut three circles, starting by the biggest one and using the one to the next each time. I then cut them in half and form three cones that I staggered on the front of the card.

I added a trunk for the tree, and used my bone folder to add a 1/2 inch frame around the card.

-315-

Until next time!

Friday, November 23, 2012

Piano Keyboard Thank You

Piano Keyboard Thank You

Because I seem to never have enough of those piano cards... (cf posts: 43, 254, 303)

A change to my usual Piano Birthday card, this time, I made a thank you one.

The web is full of piano keyboards template to print. I made mine to fit a 4bar size card (47/8 inch).

I then printed a sentiment and cut it in 1/2 inch tag. I rounded the corners and propped it with 3D glue dots.


-314-

To finish it nicely, I added a red ribbon.

The inside is lined in white linen.

Until next time!

Thursday, November 15, 2012

Birthday Gifts in a Window

Birthday Gifts in a Window

I found that "It's Your Day" flocked paper at one of the Scrap Fair I visited last year but haven't found a use for it in a card so far.

A  Spellbinder Nestabilities rectangle die allowed me to use a small piece of it and make it stand out.

I actually embossed the die in the linen card stock before, and added the cut piece of paper inside.

The sentiment was printed from my computer and I added a little cupcake inked in light blue: it is a Stubby from Stamps By Judith, my go-to little stamp.


-313-

Until next time.

Birthday Ice Cream

Birthday Ice Cream

I used an ice cream stamp from Printworkscollection.com and colored it with my Copic marker.

 I then propped the colored image with dimensionals on the card with a printed sentiment.

-312-

It doesn't get simpler than that.

Until next time.

Anniversary Flowers

Anniversary Flowers

Last year at the sacramento Craft fair, I found those metallic embellishments from Scrapyard 329, and I have been using most of the graduation and party related ones.

This red bouquet just found its place.

I printed the sentiment from my computer, and added a piece of linen run through my Cuttlebug in an embossing folder, at the bottom.

I then glued a small red ribbon.


-311-

A two step card, simple and cute...

Until next time...

Christmas Trees


Christmas Trees

Pinterest is for me a mine of ideas, that I usually pick at,  ending up with a totally different card from the one that inspired me. 

This time, it was just perfection. This card was pinned from a SplitcoastStampers gallery (Biggan: card FS192 Two Treest and a Star), and the artist used corrugated cardboard for the trees and the star.

it is just beautiful!


Here is my version of it, using simple Kraft paper.

I run the white linen through a cuttlebug folder, giving the feeling snow is falling in the background.

The star was cut with a QuickKutz die, and I used puff 3D paint for the ornaments on the tree.


-310-


I also propped the top tree with 3D adhesive. The trees are a little slanted on purpose.

Until next time!

Wishing You a Happy Birthday

Wishing You a Happy Birthday

Simplicity is the word. My favorite cards are the one that scream simplicity.

In the same spirit than my post # 264, 
a nice sentiment and a lightly stamped image.

-309-

I used a studio g stamp, inked in pale khaki color and used puffy paint for the flowers.

The sentiment is from my computer, with two different fonts.

Until next time!


Tuesday, November 13, 2012

Birthday Candles

Birthday Candles

This must have been the easiest card to make... 

I found this idea on the Hero Arts site: it is from Donna Mikasa whose blog (http://3umbrellas.blogspot.com/2012/05/best-wishes.html) is full of the most simple and yet adorable cards.

The hardest part would be to choose the right font, and on my computer, the sky is the limit. 

I must have thousands of cute fonts I collected over the years.

-308-

Once the card is printed, I took my Viva Paper Pen sunny yellow 3D paint and added some flames for these candles. 

The picture doesn't give it justice, it is really 3D.

A quick and easy one!


Snowman

Snowman..

Ah, this is more of the season.. .although, living in Southern California, I can assure you that our November is pretty summery.

Now, I was surfing the net looking for an idea of Christmas card and this one was just too cute to pass...

Check out Anya Schrier blog:

http://aschoss.blogspot.com/2010/12/baby-its-cold-outside.html

it is full of beautiful cards. 

I was obsessed by the one below:
so striking and yet, so simple to execute.


Here is my version of it, pretty similar.

I run the blue cardstock in a Sizzix folder, and use the Lifestyle Circle dies to make the three circles of the snowman.

I inked the edges in light blue and propped them up with some 3D sticky.

The arms and nose were cut by hands and I taped the two pieces of the  scarves under the top circle.

-307-

I left the cover without a sentiment, because the card itself is pretty explanatory...

Not done just yet... another post is coming right now...

Mother's Day Garden

Mother's Day Garden...

I know Mother's Day is far from now, but I had made that little garden patch with a fence a while back (probably in May when Mother's Day was in the air) and never got to use it. 

Today IS the day.

I used a clear stamp from Martha Stewart for the stems of the flowers, and a Stick Stamps from Stamps by Judith for the flower itself.

The fence is cut with a Papertrey Ink die, out of kraft paper.


-306-


The sentiment was printed from my computer, and I used a Spellbinder Nestability to cut a frame around it.

This framed sentiment is glued on the card with some 3D stickers.

I used a pink paper the color of the flowers to make them stick out, and chose to round up only one corner of the card.

Until pretty soon again....


Happy Birthday in Flip Flops

Happy Birthday...
... in flip flops

-305-

I am back...

After 5 months and 6 days of complete inaction on the posting department, I am almost afraid to post again.

Not that I have been unproductive for this whole time, but my card making has been on the back burner as I was trying to catch up with my kids scrapbooking.

I made this card for a dear friend of mine, she is exactly that: a row of colorful flip flops on a line with a flowery and lively background. Every time I make a card, I have the image of the person it goes to, and this time, it was a no brainer.

I used a Whipper Snapper Designs stamp (www.whippersnapperdesigns.com) that I purchased at the Sacramento craft fair last october.

I then got my Copic markers out, which made me realized that I really need more of those.

The paper I used in the backing is a "Me and My Big Ideas" one that i have also forever but found too "bold" to use. Well when you only leave a little showing it is of the best effect.

Until very soon this time...