Saturday, March 31, 2012

Birthday Orchid

BIRTHDAY...
... orchid.

As Clean And Simple goes, it doesn't get any better than that.

A simple orchid stamped next to a classy sentiment.


-264-

I used an orchid invite stamp from Stampendous.com, but masked the "invite" part.

I chose a khaki ink to soften the printed image, and filled up the petals part with 3D paint, my go-to Tulip Metallics in white.

When I say simple, I mean simple... simple the results, simple the making...

Until next time...

Butterflies Birthday

BUTTERFLIES...
Birthday.

I always liked cards with a feeling of movement. Nothing like butterflies ready to take flight to illustrate this.

When I was in Julian last week, butterflies were fluttering all over freshly blossomed flowers.

 This inspired me to design this card for a very special friend of mine. I chose this country feel designer paper for its striking resemblance to the field of little flowers under the apple trees.


-263-

The butterflies were made with a Martha Stewart punch, as well as the bottom edge of the patterned paper.

I added a "body" to the butterflies with puffy paint, Tulip Metallics White.
Look closely... bottom right... a little heart in puffy paint.

The sentiment was designed on my computer.

Until next time...

Thursday, March 29, 2012

Thank you... For being so thoughtful

THANK YOU...
... for being so thoughtful.

Pinterest is MY source of inspiration, daily.

 I found a beautiful card from:

http://iminhaven.blogspot.com/


and another from:

http://www.splitcoaststampers.com/gallery/photo/1965165


and had to try one (or two) of my own...

I just loved the two tones, silver and white.


-262-

For both of the card, I printed the sentiment on a silver card stock cut 2/8 shorter than the regular width of an A2 card.

I also punched the bottom edge with a Martha Stewart edger puncher.

For the top one, I used a new stamp from ditto, and just colored the leaves with my copic.

The bottom one used daisies stickers from Stickopotamus and I free drew the stems using a Pentel gold metallic gel pen. Very often, it will appear khaki color on some card stock.

This is it! Thank you my fellow crafters for inspiring me every day.

Until next time!

Wednesday, March 28, 2012

Thank Heaven for little girls


Thank Heaven for little...
... girls.

This Papertrey Ink stamps set is just adorable. I just had to use the sentiment... for little girls today, next time will be for little boys.

Below are two versions of the same card.


-261-

The baby footprints stamps is a Recollections one carried by Michael's.

The sentiment is from Papertrey Ink and the heart embossed background is achieved through a Cuttlebug embossing folder,

The frames are made with Nestability.

Until next time...

+++ the best is yet to come +++


+++ the best...
... is yet to come +++

Now... How cute and versatile is that quote? 

It is perfect for so many occasions: you could make it a wedding card, a new baby card, a graduation card, etc,  etc...

Below are two of my takes, a wedding card and a new baby card. I am sure I will use this again in a near future.

Just in case you want to do the same, I added the image below.


Let me know if it is easy to download and use.

For my first card, I had a craving for flowers and dragonflies. This is what came out!


Here is a close up of the printed sentiment...
 I love the flying  birds in an infinite sign pattern.


The dragonflies are printed in white on silver card stock and I added some dimensional glittery paint on top of the body.


The flowers are punched paper and the centers are made with a Paper-Pen from Viva, in 3D paint Sunny yellow. Any dimensional paint would work there.

I used a Martha Stewart stamp for the flowers stems, and a Martha Stewart edger punch for the bottom of the silver panel.

The finish touch was a simple bow in clear ribbon.


And now, for a totally different use of this sentiment, a new baby card.


-260-

I just can't get enough of this little Recollections baby footprints stamp. I used Nestability to cut a simple circle and a scalloped one to frame the printed image.

 It is then propped up with some foam stickies.
Et voila!!!!

Until next time...

Tuesday, March 27, 2012

Best Wishes, Today and Always

BEST WISHES...
... today and always.

I am back... I am sooo back... Today was one of those productive day I haven't had for month.

In a mere 4 hours, I made 12 (yes TWELVE) cards... Just that. Let's see how many will I post today...

 I have to say those ideas have been brewing for a few days, weeks may be. 
But life got in the way.

Tonight I feel like a million, like always when I realize I used my time wisely.

Here is the first card, with two different sets of clouds. I couldn't decide which ones were more suitable.


-259-

I found this sentiment, somewhere on the web.

It might have been a stamp, and I hate to say I do not know where that stamp comes from.

I printed my sentiment, and added a stamped image of the swirl on top and bottom.

The rainbow stamp is a DeNami Design. I stamped it on a separate piece of paper, colored and cut it out before taping it, to avoid having the color sip through the paper. 

The clouds were made with a Fizkars mini cloud punch.

Until next time.

Until next time...

Monday, March 26, 2012

Mason Jar Thank You Card

MASON JAR...
...thank you card.

One more! This one was an easy switch. 

I am still in love with the mini cards I made to accompany the care packages we will be making later this week (post #245).

I thought it will make a beautiful thank you card.

I just had to make it a standard 4Bar size.


-258-

I used a Rubber Cafe stamps for the daisies, and a Stamp By Judith mason jar stamp.

I propped the Mason Jar image with foam stickies and tied a very slim ribbon around the mouth of the jar.

I rounded the corner of the cards.

Watercolor pencils coloring give the whole image a smooth finish.

The sentiment was printed on my computer.

Until next time...
Topiary Thank you

TOPIARY...
...thank you.

I am back...

Spring vacation are here, robbing me of my time. Not only did I not have any time to post, I had no new card! 

Until yesterday.

Spring is here, and all those flowers in bloom and bird singing made me want to revisit simple thank you cards.

Below is my first attempt.


-257-

I love the scoring around the framed image. It gives depth and definition to the image. The trick is to make the measurement equal on each side (1 inch on this card) and equal around the frame too.

I used Martha Stewart clear stamps for the pot, grass and topiary.

Until next time...

Wednesday, March 21, 2012

Baby Footprints

 BABY...
... footprints.

How much more beautiful does it get? It doesn't need much more to make a simple little card. A ribbon, a bow....

There is not much to it, really... may be trying to decide what ribbon would go?

Barely a heartache...


-256-

I used a Recollections baby footprints stamp and went through my stack of ribbon and found a few that would do the trick.

The sentiment was printed beforehand.

Until next time....

Sunday, March 18, 2012

Yet again... More Graduation Cards

YET AGAIN....

... more ideas on graduation cards. 

I guess I never get enough of those.

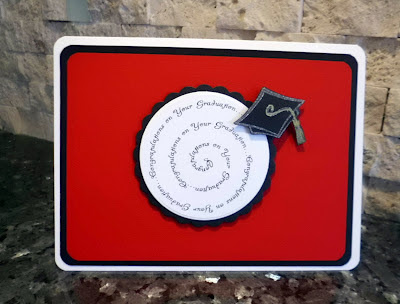
Red and Black are our high school colors, so most of my ideas come in those two colors. Don't they go together beautifully?

For a change, I rounded the corners of the cards....


-255-


I am still using that $1 Michael's stamp set. I cut out the stamped images and used foam stickers to prop them up a little.

The two sentiments are printed on my computer.

I found the circular sentiment at:


http://rubberstamping.about.com/od/digitalstamps/tp/free-printable-sentiments.htm


Until next time.


Saturday, March 17, 2012

Birthday with a Piano

BIRTHDAY...
... with a piano.

Ever since I made that pop-up piano card back in the day (cf post #43), I have been in love with birthday card in a music instrument...

Here is the piano pop up card I am talking about...


...the template is at:

http://afrenchaccent.blogspot.com/2011/11/piano.html

I used the same idea of an open music sheet for my new piano card.

The web is full of keyboard and sheet music images. You can choose the one that fit you best.

You can also choose a different accent than the little flowers I added, music notes for example.


 -254-

I used a black card-stock and drew freely a shape of a Grand piano. 

The keyboard and piano music sheet were downloaded from the  web.

I just cut around the sheet music with a cutter, leaving 1/4 inch top and bottom. 

You will need to bend a little the sheet music to have the impression that the music piece is open.

Until next time...


Wednesday, March 14, 2012

So Blessed...


SO BLESSED...

Today was the day I  was going to "jump" and try myself at those flip cards you can see all over the Stamping Blogs.

What a better occasion than to celebrate than a new arrival?

Below is my take on it.


-253-

Those flip cards are from A Cut Above.

I used a EK tags punch for the drawers, and the little detail at the bottom of the dresser is made with a Nestability.

I inked the edge of the cards and the drawers to make them stand out a little.

The teddy bear is a Martha Stewart punch and the girl sentiment is made with a Rubber Cafe stamp on top of a Lifestyle crafts party tags die cut.

Until next time...

Tuesday, March 13, 2012

S {ICK} ?

S {ICK} ?...
...feel better soon!

Another wonderful find on Pinterest! (Don't you love that place...
After Facebook, here is another dangerous way of loosing a lot of your time.)

Anyhow, this card is a card with a twist! Once you open it, you have a...


...kleenex box stuffed with a tissue!


What a clever idea!  Lorri Helling on her blog,  "Confessions of a Stamping Addict", has very easy directions on how to makes this tissue box.

Here is the direct link:

http://stampingaddict.blogspot.com/2012/01/cold-and-flu-season-get-well-card.html


-252-

Unfortunately the stamp I used doesn't have a brand on... I got it at Joann, of this I am sure.

I also used my Martha Stewart Baker's twine. It always add a beautiful final touch to any card.

Until next time...

You Made my Day...

YOU MADE MY DAY...
... a little brighter.

There is no other day better fit for this card than today... or the other way around.
I was awaken this morning by a phone call from my daughter announcing she was accepted in Boston University for graduate school. 

We have been waiting for months to hear such a good news.

Here I am, uploading this card on my blog, and I am thinking this is a card made for occasions like this one.

I lifted this idea from Debby Hughes. She has a wonderful blog, Limedoodle and if you want to see her card, follow the link below:  

http://limedoodle.blogspot.com/2011/08/you-made-my-day.html


-251-

I do not own the Lil' Inker dies and stamps, I used a Quickutz rainbow die and two Fiskars punches for the small and bigger clouds, instead

The big cloud was turned into a tree canopy per Debby idea. 

I run a die cut through my Cuttlebug with 6 different colored card-stocks to make a truer than life rainbow.

The sentiment was printed in my computer, and the little heart is a Stubby from Stamps by Judith.

Until next time...

Sunday, March 11, 2012

It's a Boy/ It's a Girl


IT'S A BOY...
... or it's a girl.

I had those two sentiments in mind when I designed the next four cards.

A couple of days ago, I played with my new stamp/die cut set from Papertrey Ink and made a few pieces of baby clothing but I had no definite idea of a card. 

Yesterday it hit me...

Below is the result of that "bon sang mais c'est bien sur".

Two sets of cards, with the "boy" and "girl" version for each...


-250-

The stamps and die cuts are from Papertrey Ink.

The two different fonts I chose are Kozuka Gothis Pro and England Hand DB.

I just love to mix fonts...

Until next time...

Graduation... a last hick-up....

GRADUATION...

... a last hick-up.

Well just for this week at least. I can't say the Graduation virus won't strike again but for now, this is it.

Two more little simple cards, with popped up graduation classics (a cap and a diploma), inside a circular sentiment, you can download below:


http://rubberstamping.about.com/od/greetingscards/ig/Birthday-Sentiments/

It doesn't get any simpler than that.

I chose silver and black, but this card could be customized to any high school or college colors.

Looking at the pictures below, I just realized I forgot to highlight the tassel and the cord on the diploma in gold... just close your eyes and imagine.


-249-

I am still using that $1 stamp set, my favorite when we talk graduation.


Until next time...

Saturday, March 10, 2012

Graduation... again?

GRADUATION....

...again???? Well, when I get inspired, I just ride the wave...

Two words were blinking in my mind: Graduation and Simple... Below is the result. 

Two very simple graduation cards, made in mere minutes...


-248-

I used one of those $1 stamp set in metallic ink on black card-stock.

I doodled the path of the soaring cape with a black marker.

I also stamped the same cap stamp in black ink under, on the white card-stock and use a metallic gold Pentel to highlight the tassel.

The black cap was propped with a dimensional.

Until next time...

Love You

I LOVE YOU...

... three little words, packed with punch AND oh! so versatile. 

A card adorned this way, can work from Valentine's day to Father's/Mother's Day to a special anniversary.

I first saw this card on a papertreyink blog, and fell in love with it...

The mix of Kraft paper, baker's twine and the simplicity of the message...
Check it out:

http://apassionforpapertrey.blogspot.com/2012/02/challenge-needle-and-thread.html


-247-


Choosing the font is very important; you have to find one that feel just right.

I printed "love you"  on a Kraft paper from paperandmore.com and used Martha Stewart baker's twine.

I made 3 more of this card and I made the "X" smaller (1 inch instead of 1 1/4)... I think it looked better.

The kraft panel is raised by dimensional squares.

Until next time....

Thursday, March 8, 2012

Hush....


HUSH....

... I just hope Jen is too busy with her everyday life to go check my blog. 

My daughter 22nd birthday is right around the corner and I have been thinking and thinking, surfing the web over and over, looking for the best matched card for her birthday. 

I found it.

A heart, because she fills up mine...

 A bouquet of flowers, because that is the feeling we have when she is home...


-246-

This card was made using my Slice.

I had to fiddle to find the perfect size for the "2s" and the perfect font as to have them fit in the heart.

The rest is easy as a breeze: punch two sizes of flowers in two different colors and fill up the heart!

The bow is a bunny ears bow, the easiest to make.

The heart of the flowers is made with a 3D Tulip, metallic paint.

Now come the hardest part in the whole process: waiting for the paint to dry.

Avoid a whole lot of problems and wait overnight before handling this kind of card.

Here is the same card without the 22:


Until next time....

Happy Spring

HOW DELIGHTFUL...

 ...it is when you can feel the change in the air in the morning, even if there is that leftover crispiness from a lingering winter.

That prompted me to design this very simple mini card for our upcoming college girls care package. 

A bitter sweet one, because this time, no hiding, it will be the last... our 22 years old girls are graduating this spring and there goes the excuse, us moms (and friends for more than 15 years) have been using to get together around appetizers and wine 4 times a year, for the past 4 years.


-245-


             This mini card was made using a stamp that is going to become my favorite, no doubt: the "mason jar" from Stamps by Judith and Heather. I stamped it on white linen, colored it and cut it out before adding it to the card with dimensionals.

That allowed me to add a small piece of ribbon around the mouth of the mason jar.

The little flower on the bottom corner is also from Stamps by Judith: one of their Stubbies.

The bouquet of daisies is from The Rubber Cafe and I tried myself at watercolors this time.

 For once, my Copic markers stayed in their drawer, and I used the VersaMarker pen with the watercolors pencils.

It was as much fun as when I was kid, using a watered down paint brush on those coloring book with dry paint.

Will use those more from now on...

I used a sentiment printed on my computer and added a dotted line as stem for the flower, before rounding the corners of the card.


Until next time.....

Wednesday, March 7, 2012

Flowers in Jars


FRESH...

... I felt like designing a "fresh" card... 

When my kids were little there was not a day that passed by when one would not come to find me in the kitchen with a little flower they had picked in the garden for me.

I would grab a jam jar, fill it up with water and put the lone flower in on top of the countertop.

How proud would I make them then....

Three kids, three flowers, in the three windows of this card.

This is a peek of my life, some 10 years ago...


-244-

This window card is from A Cut Above, the mason jar stamp is from Stamps by Judith.

The lone flower is a composite of a stem by Martha Stewart and a daisy stubby from Stamps by Judith.

The circular Happy Birthday stamp is from Sparkle'n Sprinkle, and I attached the tag made with a punch with some Martha Stewart baker's twine.

The Copic markers were lightly used.

Until next time....

Just For You


LAST OCTOBER...

... I went to Sacramento to attend the Scrap Fair there, and I stumbled upon an exhibitor who was showing how to make those beautiful glass pendants.

You need a special glue, some glass square, some bells to hang the pendant... then comes the fun part.

You need nice pictures, and the internet has plenty of those!

Below are a few cards I made to hold these pendants.


-243-
-55-
-56-

The windows are made with the Nestability, those are the perfect tool to make a window and a bigger window in a different color top card stock, giving the feeling you are looking at a frame.

 The top paper is tiffany Blue in color, and as most of the card stocks, envelopes or plain paper I use, comes from this wonderful company Paperandmore.com.

They have the best customer service, the price are competitive and they are fast to ship!

I run that paper in a Cuttlebug embossing folder.

The banner was printed on the computer.

I just added a few dot of green with my copic marker.

Until next time...

So Very Proud of You


GRADUATION...

... come Spring, it seems to be in everybody's mind.

 Our High School colors are red and black and it is very difficult for me to think of any other colors when designing one.

Now that I think about it, since my daughter is graduating from Davis in less than 4 months, I should may be thinking Blue and Gold...


-242-


The graduation cap is actually a petal card, and you can find the template all over in the internet.

The sentiment is printed not stamped, and the red card stock is a glossy red I found at Kelly Paper.

 I always follow Dawn Olchefske (Stampin up demonstrator) directions for the tassel.

You can find a tutorial at the site below.  Dawn is wonderful with directions... as well as finding delightful ideas:

http://www.youtube.com/watch?v=B_IxakbDJpg&feature=player_embedded


I run out of Gros Grain ribbon (the best to make tassel this way) and used very slim ribbon  and a square brad.

Until next time....